

As I mentioned, I’m posting an occasional tip on using Scrivener. Hope you find it useful.
To start a new project, click File>New. You should see a page entitled Project Templates. When you have time, look through these, and perhaps open a few dummy files with the different templates so you can see and compare. You can delete these dummy files afterward.
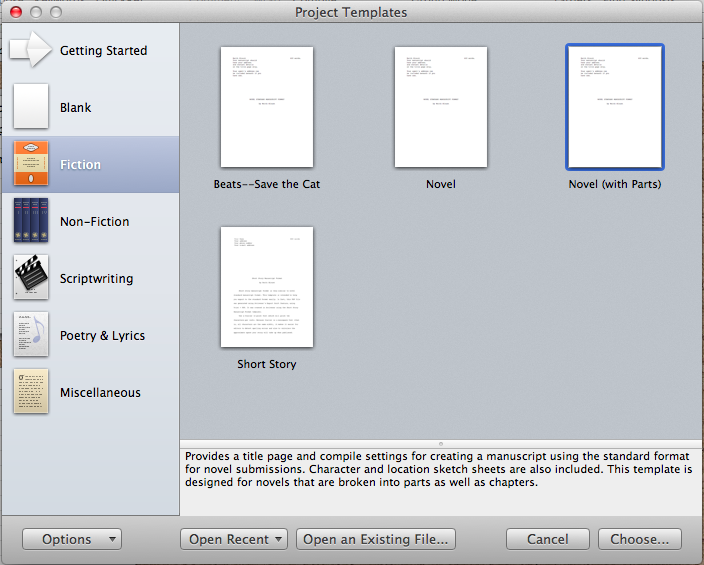
All the templates are based on the Blank template, and have been somewhat customized. You can take it from where Literature and Latte left off and further customize your project to your liking.
For example, click on Fiction. Within this folder you’ll see Novel, Novel with Parts, and Short Story. Click on each one of these to read a brief description of the template.
One of the things the Fiction templates have already built in is a Character Sketch, tucked away in the Research folder. Also find a Setting Sketch. You can use these as is or customize just the way you like.
Other things, like the the Labels, have been preset for a typical novel setup. Consider these a starting place.
By clicking the Options button at the bottom of the list of templates, you can access the ability to import templates. Google “Scrivener templates” for examples of the kinds of templates others have set up and have posted online for sharing. I’ve enjoyed being able to import a super detailed template based on the Hero’s Journey. Then I was able to customize it for my own use…much faster than creating one from scratch. I also made myself a template based on the 15 beats described in Save the Cat.
The Getting Started button at the top left (with the arrow) contains links to tutorials and the massive User’s Manual.
Hope this helps you to take your first step with Scrivener! Please let me know if you have any questions.

Thanks, Margot. Your tips are better than the Scrivener tutorial!
Thank you. Nice and simple. Something that actually FACILITATES using the program and the writing we love to do.